Guitar Basics
Tuning your Guitar
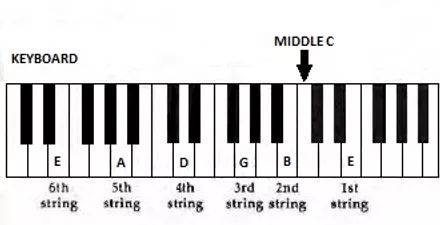
Tuning to a Piano
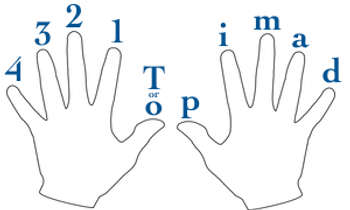
When you are tuning your guitar, you will adjust the pitch (highness or lowness of sound) of each string by turning the corresponding tuning key. Tightening a string raises the pitch and loosening it lowers the pitch.The strings are numbered 1 through 6 beginning with the thinnest string, the one closest to your knee. Tune each string in sequence beginning with the sixth string, by play in the correct key on the piano (see diagram) and slowly turning the tuning key until the sound of the string matches the sound of the piano.
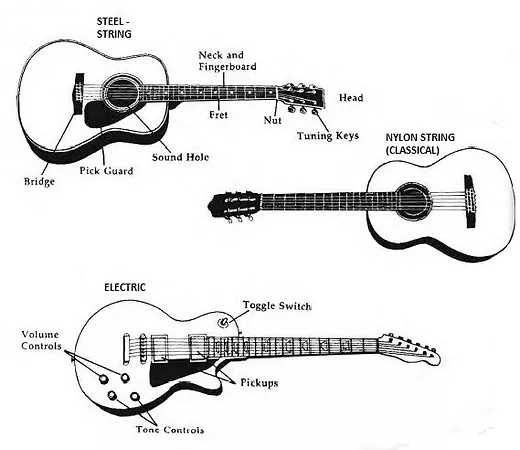
Guitar Types
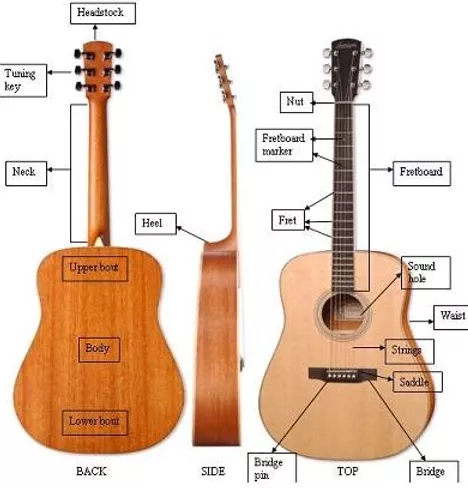
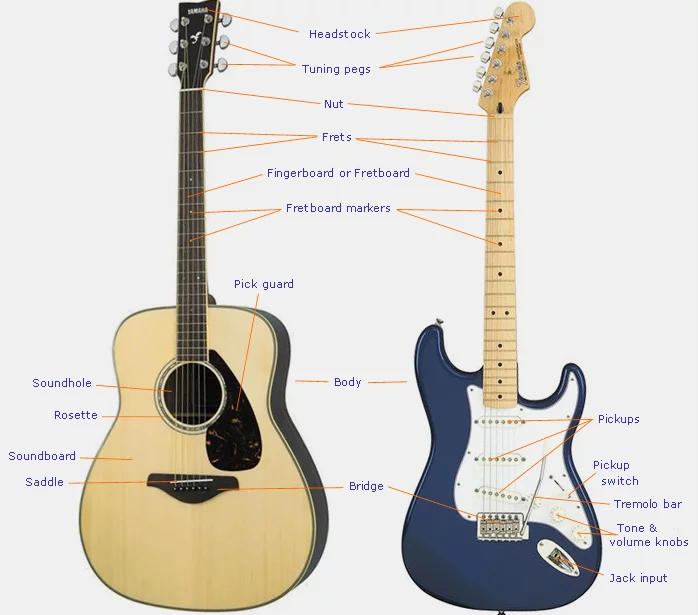
Classical guitar parts
At the top of the guitar in the illustration is the “headstock”, a general term which describes the part of the guitar attached to the slimmer neck of the instrument. On the headstock are “tuners” or “machine heads”, which you will use to adjust the pitch of each of the strings on the guitar.
Examine the neck of your guitar. You’ll notice there are metal strips running across its entire surface. These pieces of metal are referred to as “frets” on a guitar. Now, here’s what you’ll need to keep in mind: the word “fret” has two different meanings when used by guitarists. It can be used to describe:
1- The piece of metal itself
2- The space on the neck between one piece of metal and the next
The area of the neck between the nut and the first strip of metal is referred to as the “first fret”. The area on the neck between the first and second strip of metal is referred to as the “second fret” and so on…
Relative Tuning
There are three ways to tune your guitar. The first one, the “Relative Tuning”, is when no pitch source is available. To correct your tuning, follow these steps:
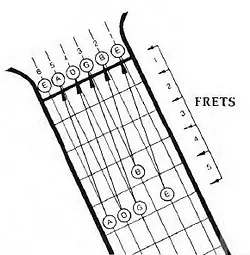
• Assume that the sixth string is tuned correctly to E (we will see how to tune this string correctly afterwards).
• Press the sixth string at the 5th fret. This is the pitch A to which you tune your open fifth string. Play the depressed sixth string and the fifth string with your thumb. When the two sounds match, you are in tune.
• Press the fifth string at the 5th fret and tune the open fourth string to it. Follow the same procedure that you did on the fifth and sixth strings.
• Press the fourth string at the 5th fret and tune the open third string to it.
• To tune the second string, press the third string at the 4th fret and tune the open second string to it.
• Press the second string

Tuning to a Piano
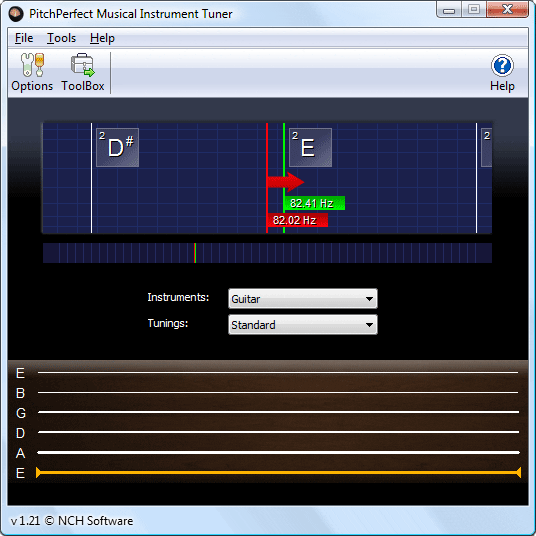
An electronic tuner “reads” the pitch of a sound and tells you whether or not the pitch is correct. Until your ear is well trained in hearing pitches, this can be a much more accurate way to tune. There are many different types of tuners available, and each one will come with more detailed instructions for its use.
You can download a freeware to tune your guitar from this site:
PitchPerfect Guitar Tuner
Guitar Tuning Software for Musicians
http://www.nch.com.au/tuner/index.html
There also available free apps for you can download for your mobile.
Tuning with Harmonics
Before we start tuning, let’s go first on
How to play harmonics on the guitar:
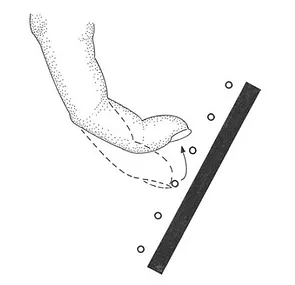
To play a harmonic place your finger directly above the 12th fret on the 6th String (thickest string) and lightly press the string with your finger, do not fret the string or push hard, just barely touch it.
Now with your right hand, pluck the 6th string. You should hear a chime-like sound. To make a clearer and longer lasting sound, immediately remove your finger from the string right after you pluck it. After some practice you should be able to play harmonics fairly easily. Try playing harmonics on the 5, 7 and 12th frets now. If the harmonic doesn’t sound clear or isn’t loud, make sure your finger is directly above the fret you are playing, and try adjusting your finger slightly. Remember not to press to hard.
Now let’s learn
How to tune your guitar using harmonics:
Tuning your guitar using harmonics is similar to how we wrote about in Relative Tuning, in the sense that we use notes on different strings as references for the string we are tuning.
First of all, make sure your 6th string is in tune (See “Tuning with a piano” and “Tuning with an Electronic Guitar Tuner”)
The 6th string should be tuned to E, if you are tuning your guitar in standard “E-A-D-G-B-E” tuning. We are using the 6th string as the reference string so if your 6th string is off-key, then the rest of your strings will be off-key with it. It will be tuned too itself so it will still sound fine in relation to itself even if your 6th string is off key. This method comes in handy if you don’t have a piano or tuner around.
Carefully follow these steps:
• Play the harmonic on the 5th fret of the 6th String and play the harmonic on the 7th fret of the 5th String. Adjust the tuning pegs on the 5th string until the 2 chimes match.
• Play the harmonic on the 5th fret of the 5th String and play the harmonic on the 7th fret of the 4th String. Adjust the tuning pegs on the 4th string until the 2 chimes match.
• Play the harmonic on the 5th fret of the 4th String and play the harmonic on the 7th fret of the 3th String. Adjust the tuning pegs on the 3th string until the 2 chimes match.
• Play the harmonic on the 7th fret of the 6th String and play the open 2nd string. To play it open means you do not fret or do a harmonic anywhere, just simply pluck the 2nd string. Adjust the tuning pegs on the 2nd string until the 2 notes match. Tip: Try not to play the open 2nd String too loud or else it might overwhelm the sound of the harmonic. Try to pluck it softly enough so the 2nd string matches the harmonic note in volume.
• Play the harmonic on the 5th fret of the 2th String and play the harmonic on the 7th fret of the 1th String. Adjust the tuning pegs on the 1st string until the 2 chimes match.
Your guitar now should be tuned.
Tips: When matching the two harmonics together it should sound like 1 note is being played. If the tuning is off you can hear a “ripple” in the sound. It kind of has a wavy sound, sort of like vibrato. The farther away from the correct tuning you are, the faster the ripple sounds. The ripple sounds slower as you get closer to the correct tuning, until eventually it disappears when you are in perfect tune, and it sounds like one note. It is hard to explain, but you should begin to hear it over time when your ears get more practice.
Playing position
It’s important to learn how to hold it in a comfortable way. Remember that you are going to be sitting down practicing with your instrument for many hours and any uncomfortable position can cause aches either in your back or your neck.
A comfortable playing position is important to provide access to all parts of the guitar without strain.
The different styles of playing have slightly different rules when it comes to handling the instrument. There are three basic positions:
Tuning with Harmonics
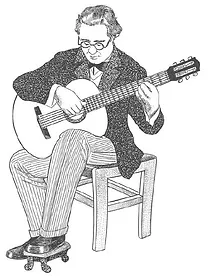
Classical players place the guitar on the left leg raised by a footstool so that the upper part of the leg will support the guitar without it slipping down. The sketch of Andrés Segovia shows the position favoured by most professional players. Some performers have both feet flat on the floor and use a special type of cushion to raise and support the guitar, but this is less common.
Sitting Correctly
First, sit comfortably in an upright chair. I recommend using the classical position, with the left foot raised on a footstool or other support, because this provides the easiest access to all parts of the guitar. The height of the footstool will vary according to your height, but for most people four to six inches is enough to provide good support. Adjustable folding footstools are widely available at music stores at moderate cost and are the most convenient solution. However, in the early stages anything that raises and supports the foot will do.
To look at your hands, lean forward rather than pulling the guitar back. It is important to keep the guitar upright. As you look to your left at the tuning machines, keep them about the level of your shoulder; the axis of the guitar should not become too vertical.
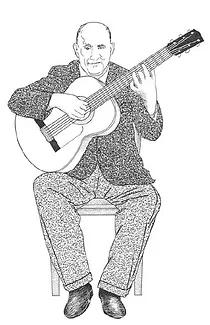
This sketch of Ramón Montoya, illustrates the traditional
Flamenco position
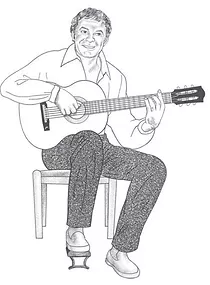
The informal right-leg position
The sketch shows the position favoured by the versatile Laurindo Almeida, a master of both classical and Latin American styles.
Most non-classical players support the guitar on the right leg. Traditionally flamenco players position the guitar at its widest point on the right leg. Most other styles use an informal position resting the guitar on the right leg. Some players use a cross-legged position, but there are physical disadvantages to this, notably the concomitant decrease in blood circulation.
Playing in a standing position, as in stage performance, requires a strap for support. The strap is attached at the bottom of the guitar’s body to a pin and commonly attached at the top by a string tied around the bottom of the headstock, above the nut. Pins can be added to a guitar for this purpose, but this should be done by a professional repair technician.
Right Hand position
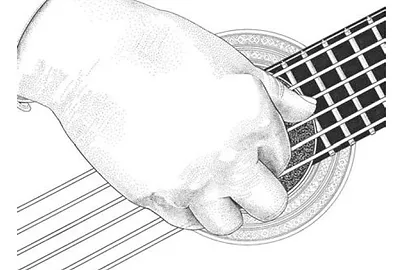
It is important to establish a good playing position for the right hand at an early stage.
Notice the position of the knuckles, running along the same line as the strings and not at right angles to them. Then see if you can position your hand so that—as you look down— you see the triangle formed between the thumb and first finger. The weight of the arm is taken on top of the guitar; don’t let the elbow slide over to the face because this turns the hand into a bad position.
Preparing your nails
With a nylon-strung classical guitar, the best sound is produced by playing with the nails. The right-hand nails should be long enough to catch and play the string, but no longer, because a long nail is an impedance and is more likely to break. As a guide, when you look at your hand with the palm facing you, you should see a ridge of nail projecting just above the fingertip and following its contour.
The nails should be shaped with a “diamond dust” or similar nail file, and after shaping a very fine finishing paper (600 grade or better) may be used to polish off any rough edges. The result will be a pure tone with no scratch to it.
Terms and Symbols in Guitar Music
Right-Hand Chord Technique
When using a pick or simple thumb strums, the focus is mainly on playing all the available notes of a chord. However, as you progress you will find that you want to select certain notes, and not necessarily those on adjacent strings. This can best be achieved by using the thumb and fingers of the right hand.
To play a chord with the fingers and thumb, first prepare the right hand by selecting the strings to be played. Then squeeze the thumb forward and the fingers back to sound the chord. As the fingers play they will naturally curl upwards, and the thumb will travel slightly upwards and toward the first finger. However, it is not necessary to pull the hand away from the strings, particularly when a succession of chords is to be played, because the hand must quickly be back in position to select the notes for the new chord.
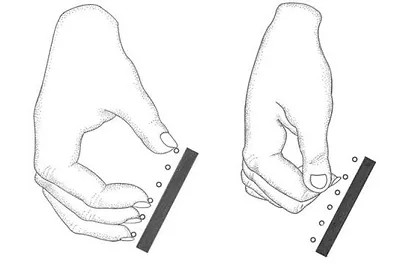
The illustrations show the preparation and completion positions of the chord.
The fingers prepare to play a chord (left). The fingers after the chord has been played (right)
Right-Hand Technique –The rest stroke
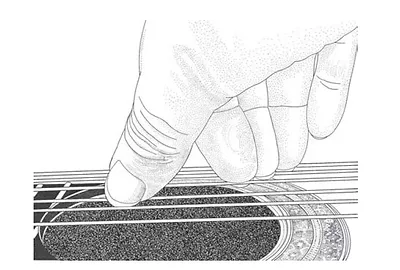
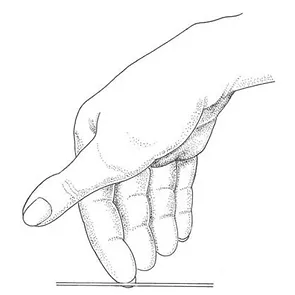
The principal stroke used for melody lines on the finger-style and classical guitar, known as the rest stroke.
The rest stroke is the technique that produces the fullest sound from a single note. It is played by plucking the string in such a way that, when the movement is completed, the fingertip comes to rest on the adjacent string—hence the name.
Here are the steps:
– The fingertip is placed on the string in preparation.
– As the nail passes the string it catches and sounds the note.
– The fingertip ends the movement on the next string.
– It is most important to keep the finger slightly curved—do not let the joint yield as the nail plays the note, because this will weaken your attack.
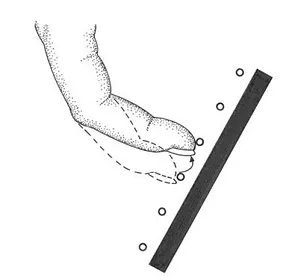
Take a look at it now from another angle. The next picture shows the nail sliding off the string at a slight angle, with the finger slanted so as to engage the string with less-than-maximum nail. This change in axis from a head-on approach softens the attack of the finger to produce a more delicate sound.
The finger is angled to engage less of the nail.
The Free Stroke
The free stroke is used in chords, in arpeggios as demonstrated below, and in single-note situations where the rest stroke is not practical. It differs from the rest stroke in that the finger comes clear of the adjacent string at the end of the movement.
Successive notes played with the free stroke use alternation in the same way. Try playing the exercise that you did with the rest stroke and you will notice the different sound. Good are able to develop a full sound that almost has the quality of a rest stroke.